Why Extension Tube Photography Deserves a Deeper Look
If you’ve been researching budget macro, you’ve almost certainly come across extension tubes. They’re marketed as the ultimate cheap shortcut: hollow cylinders that sit between your camera body and lens, turning a standard kit lens into a close-up machine — for as little as $15.
And that’s all true. But it’s not the whole truth.
After spending serious time using extension tubes with everything from nifty-fifties to telephoto zooms, I’ve found that most guides skip the nuances that actually matter once you’re in the field. The physics are simple, but the practical trade-offs are real — and understanding them before you buy will save you frustration (and possibly money).
Here are six surprising things about extension tube photography that every macro shooter should know.
1. No Glass Is the Whole Point — And the Superpower
The most counter-intuitive thing about a camera extension tube is that there’s nothing inside it. No optics. No glass. Just air.
 Check price
That sounds like a rip-off until you understand why it matters. Unlike close-up filters or teleconverters, an extension tube adds zero additional optical elements between your sensor and the subject. That means:
- No extra chromatic aberration introduced
- No resolution loss from budget glass
- No colour shifts or coatings to worry about
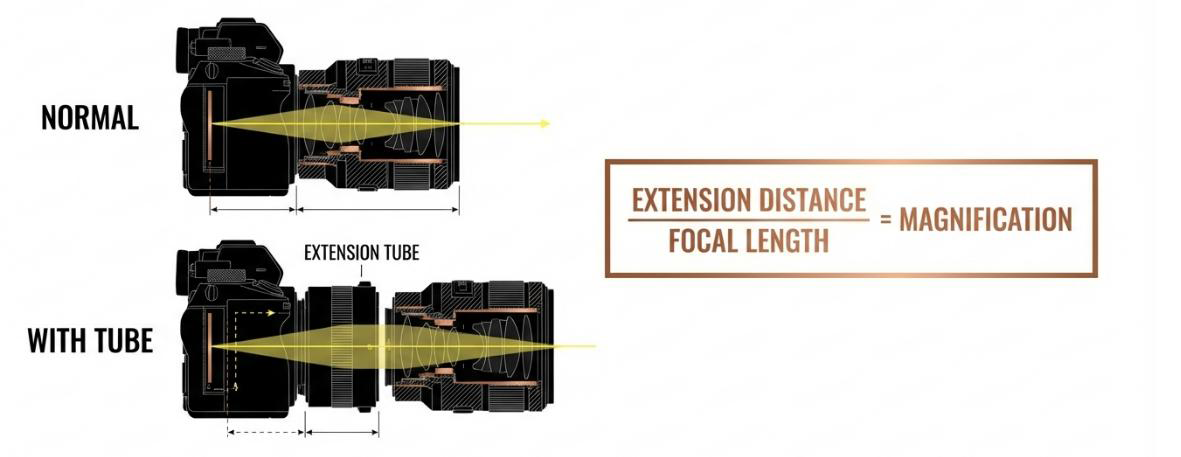
The tube works by physically pushing your lens further from the sensor, which shortens the minimum focus distance. You can suddenly get much closer to your subject — and closer means bigger.
The trade-off? Because the lens sits so far forward, it can no longer focus to infinity. While the tube is attached, distant subjects are completely off-limits. But for macro work, that’s rarely a problem — you’re already committed to the close-up world.
“An extension tube is a hollow tube with no optical elements and does not affect image quality… although, they do tend to accentuate the flaws of the lens.”
— Adorama
If your extension tube lens combination starts with a sharp lens, the results can be excellent. But if your lens already has soft corners or barrel distortion, the tube will amplify those weaknesses, not hide them.
2. The Magnification Flip: Shorter Lenses Win
This is the truth that surprises most beginners — and it completely changes how you think about using extension tubes for macro photography.
The instinct is to pair extension tubes with your longest lens. A 200mm telephoto should benefit more from extra magnification, right?
Wrong. The maths works the other way around.
The formula is simple:
Added magnification = Tube length ÷ Focal length
So a 25mm extension tube on different lenses gives you:
| Lens | Tube | Added magnification |
|---|---|---|
| 50mm | 25mm | +0.50× |
| 100mm | 25mm | +0.25× |
| 200mm | 25mm | +0.125× |
A 50mm lens with a 25mm tube gains a massive 0.50× boost on top of its native magnification. The same tube on a 200mm? A barely noticeable 0.125×.
This is the “magnification flip” — and it means that photo extension tubes are a high-leverage tool for owners of standard kit lenses (like an 18–55mm) or fast primes (like a 50mm f/1.8), not for people trying to squeeze macro out of a telephoto zoom.
If you already own a “nifty fifty”, an extension tube set can push you surprisingly close to true 1:1 macro — for a fraction of the cost of a dedicated macro lens.
 Check price
3. The Light Loss Nobody Talks About
Here’s where the “no glass” advantage gets complicated.
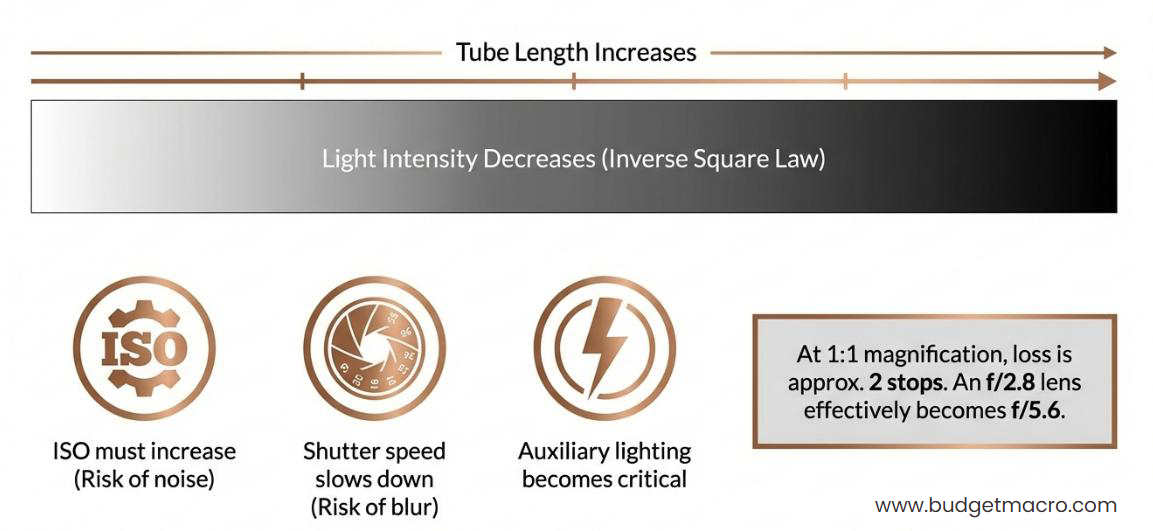
Even though there’s nothing physically blocking light inside the tube, your exposure will drop — sometimes dramatically. The reason is pure physics: as the lens moves further from the sensor, the same bundle of light has to cover a larger area. It’s the Inverse Square Law at work, and it hits hard.
At a 1:1 magnification ratio, you typically lose around two full stops of light. Your camera still displays f/2.8 on the screen, but the light actually reaching the sensor is closer to what you’d expect at f/5.6.
 Check price
Now consider that serious macro photography usually needs f/11 or f/16 for any reasonable depth of field. Add two stops of light loss on top of that, and you’re effectively shooting at f/22 or f/32 in terms of exposure. That’s dark.
What this means in practice:
- You’ll need significantly more light than you expect
- A ring light or LED panel goes from “nice to have” to “essential”
- Shutter speeds slow down, so a tripod becomes critical
- ISO creep can eat into your image quality
This is one of the most overlooked drawbacks of using extension tubes with macro lens setups or kit lenses alike. It doesn’t mean tubes are bad — but it does mean you need to plan your lighting before you head into the field.
4. Not All “Empty” Tubes Are Created Equal
You might assume that since there’s no glass, build quality doesn’t matter. After all, you’re paying for a hollow cylinder — how different can brands really be?
Very different, it turns out.
The best extension tubes separate themselves from the cheapest options in two key areas:
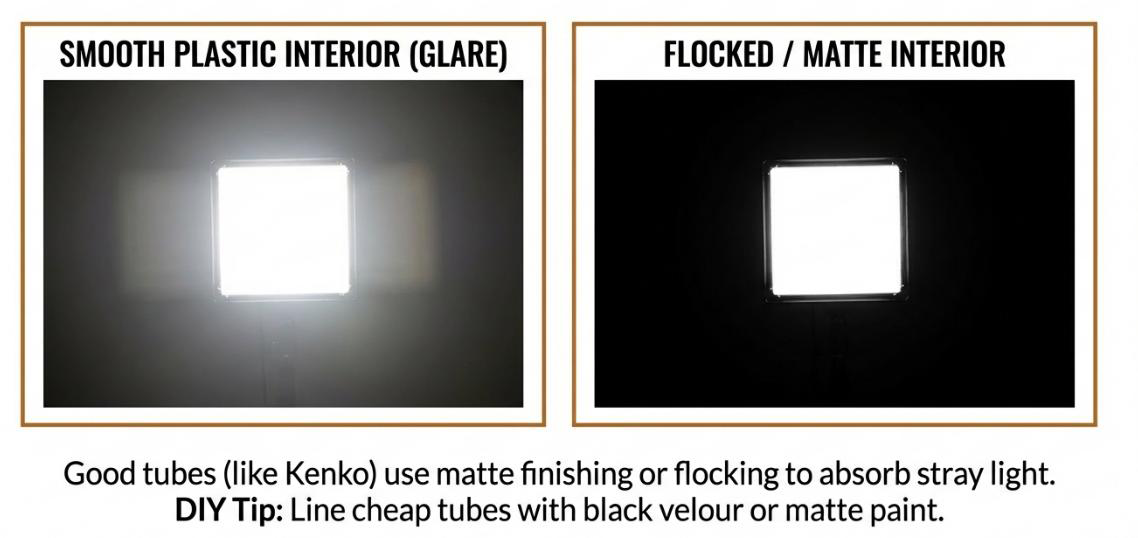
Internal flare suppression
- Premium tubes (like Kenko) use internal felt flocking to absorb stray light. This prevents reflections bouncing around inside the tube and reaching your sensor.
- Budget tubes use matte black paint instead. It works most of the time, but when a point light source is just outside your frame, painted interiors can produce a hazy, washed-out patch in the centre of your image.
 Check price
Structural rigidity
When you stack multiple extension tubes (common for higher magnification), the weak point is the mount connections. Each tube-to-tube joint introduces potential “radial play” — a tiny wobble.
On cheap tubes, this wobble can:
- Cause the lens to sag under its own weight
- Create soft edges on one side of the frame
- Break electrical contacts intermittently
 Check price
Interestingly, price doesn’t always correlate with fit. Some photographers report that mid-range Fotodiox tubes actually have a tighter mechanical fit than the more expensive Kenko sets — despite Kenko’s superior internal flocking.
“The radial play in the Kenko tubes is absolutely ridiculous considering the high price tag… Fotodiox tubes actually have a tighter fit than the Kenko tubes.”
— PhillipReeve.net
When shopping for the best macro extension tubes, check reviews specifically for mount tightness and internal finish — not just the brand name.
5. The “Dead Camera” Risk Is Real
This one is worth knowing before you commit to a $15 bargain set.
There are documented cases of ultra-budget extension tube brands causing power-on failures in camera bodies. The symptom is alarming: your camera refuses to turn on after a lens change until you physically remove and reinsert the battery.
The cause is contact bounce: poorly manufactured electrical pins that make and lose connection dozens of times per second. This rapid on-off signal can confuse the camera’s internal computer, causing software lockups or, in rare cases, hardware damage.
Saving $30–$50 by going with the cheapest possible brand is rarely worth the risk to your primary body. The best extension tubes from established brands like Kenko, Meike, or Fotodiox include properly sprung pins and quality-controlled electrical contacts.
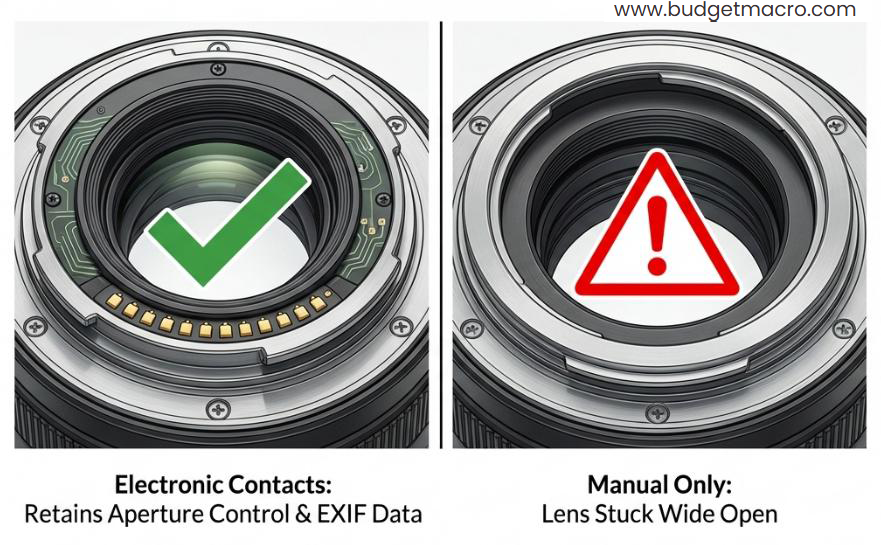
6. The “Aperture Hack” for Manual Tubes
If you buy manual extension tubes (the ones without electronic contacts), you’ll hit a wall with modern lenses: the camera can’t communicate with the lens, so the aperture defaults to wide open — typically f/1.8 or f/3.5.
 Check price
At wide open, depth of field in macro is paper-thin, making useful photos nearly impossible.
The workaround is a clumsy-but-effective hack:
- Mount the lens directly to the camera body (no tubes).
- Set your desired aperture — say, f/11 — in Manual or Aperture Priority mode.
- Press and hold the Depth of Field Preview button to physically stop down the aperture blades.
- While holding the button, detach the lens with the camera still on.
- Mount the lens onto the manual tubes. The aperture stays “stuck” at your chosen f-stop.
It works. But it’s fiddly, slow, and risks dust entering the camera.
From a practical standpoint, the $20–$30 premium for “auto” tubes that maintain electronic contacts is one of the smartest investments in extension tube photography. You keep autofocus, aperture control, and EXIF data — and your workflow stays smooth.
So, Are Extension Tubes Worth It?
Absolutely — if you go in with realistic expectations.
Using macro extension tubes is one of the most cost-effective ways to enter the close-up world. You can reveal astonishing detail in everyday subjects using gear you already own. But they’re not magic. You need to understand:
- ✅ They work best on shorter focal lengths (50mm and below)
- ✅ They introduce zero optical degradation (but amplify existing lens flaws)
- ⚠️ You’ll lose significant light — plan your lighting accordingly
- ⚠️ Build quality matters — don’t risk your camera on the cheapest set
- ⚠️ Auto tubes are worth the small price premium for modern lenses
The humble extension lens adapter remains the most mathematically efficient way to increase magnification without adding glass. Whether you’re just starting out or supplementing a dedicated macro lens, a quality set of tubes belongs in every macro photographer’s bag.
FAQ: Extension Tubes for Macro Photography
What is extension tube photography?
Extension tube photography is a macro technique where hollow tubes are placed between your camera body and lens to reduce the minimum focus distance. This lets you focus much closer to your subject, increasing magnification — without adding any glass or degrading image quality.
Can I use extension tubes with a macro lens?
Yes. Using extension tubes with macro lens setups pushes magnification beyond the lens’s native 1:1 ratio — into true “super macro” territory (1.5:1, 2:1 or more). It’s a popular technique among experienced macro photographers who want extreme close-ups without investing in specialised super-macro optics.
What are the best extension tubes to buy?
The best extension tubes depend on your mount and budget. For reliability and build quality, Kenko sets are the reference standard. Meike and Fotodiox offer excellent value with good electrical contacts and tighter mechanical fit. Avoid unbranded or ultra-budget options (under $15) to protect your camera body.
Do extension tubes work with any lens?
Extension tubes work with virtually any interchangeable lens, but they’re most effective on short to mid focal lengths (35mm–85mm). On telephotos, the magnification gain is negligible. The tube must match your camera system’s mount (Canon EF, Nikon F, Sony E, etc.) — they are not universal across brands.
Why do my photos get darker with extension tubes?
Light loss is a fundamental trade-off of using extension tubes. As the lens moves further from the sensor, light spreads over a larger area. At 1:1 magnification, expect roughly two stops of light loss. Compensate with additional lighting, slower shutter speeds, or higher ISO.
👉 Related reading: Already own extension tubes? Try the Extension Tube Magnification Calculator to see exactly how much closer they’ll get you, or explore reverse lens macro for even more extreme magnification on a budget.