Understanding Effective Aperture and Light Loss in Macro
Now that we’ve covered the basics, let’s look closer at what’s really happening. (If you haven’t read the beginner-friendly introduction to effective aperture, you might want to check that out first for a simple overview.)
In photography, light is often measured in stops — each stop either doubles or halves the amount of light reaching the sensor. So when we say you “lose 2 stops” in macro, it means your camera actually needs about four times more light to get the same exposure.
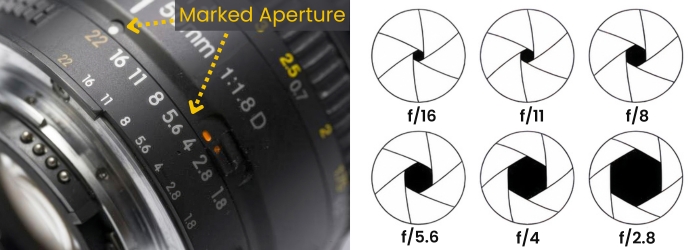
Here’s where effective aperture comes in. At normal distances, your aperture setting (say f/8) behaves as expected. But once you move into macro territory, especially with extension tubes, the lens is pushed farther from the sensor. From the sensor’s point of view, the opening looks smaller than what you set — so your effective aperture might be closer to f/16.
That’s why your images get darker, why shutter speeds slow down, and why depth of field and sharpness behave differently at close focus. In other words, understanding effective aperture is the key to predicting how much light you’ll lose and how your photo will look when you go beyond normal shooting distances.
Analogy: Imagine a projector on a table. Slide it further from the screen and the picture gets dimmer. With macro, you’re sliding the lens further from the sensor; the image gets dimmer for the same reason — geometry.
The Simple Formula
Effective f-stop = Marked f-stop × (1 + Magnification)
Want to see the numbers instantly? Use the Macro Effective Aperture Calculator to quickly determine your effective f-stop and magnification.
- Marked f-stop is what you set on the camera (e.g., f/8).
- Magnification (M) is your “size on sensor ÷ real-world size.”
- 0.5× means half life-size (1:2)
- 1.0× means life-size (1:1)
- 2.0× means twice life-size (2:1)

What it means: At 1:1, whatever f-number you set acts like 2× that number in terms of brightness and depth-of-field behavior (f/8 behaves like f/16). At 0.5×, it acts like 1.5× (f/8 behaves like ~f/12), etc.
A few more examples (Step by Step)
50 mm lens + 25 mm extension tube
- Magnification (approx.) M ≈ extension ÷ focal length = 25/50 = 0.5×
- Set f/8 → effective ≈ f/8 × (1+0.5) = f/12
- Expect a bit over +1 stop more light needed vs. normal focus.

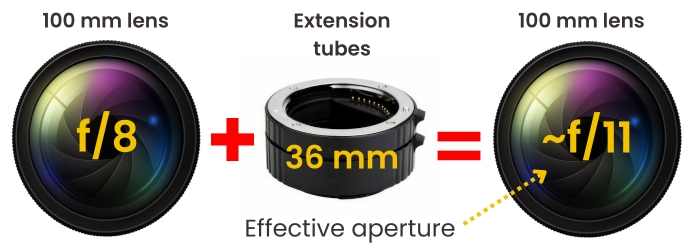
100 mm lens + 36 mm extension
- M ≈ 36/100 = 0.36×
- Set f/8 → effective ≈ f/10.9 (~f/11)
- Expect just under +1 stop more light needed.
Rule of thumb for tubes on a prime: M ≈ extension ÷ focal length (good first estimate).
Table A — Marked vs. Effective f-stops (Common Magnifications)
(Rounded to familiar 1/3-stop f-numbers for convenience.)
| Magnification (M) | f/4 → | f/5.6 → | f/8 → | f/11 → | f/16 → |
|---|---|---|---|---|---|
| 0.25× (1:4) | f/5.0 | f/7.1 | f/10 | f/14 | f/20 |
| 0.50× (1:2) | f/6.3 | f/8 | f/11 | f/16 | f/25 |
| 0.75× (3:4) | f/7.1 | f/10 | f/14 | f/20 | f/29 |
| 1.00× (1:1) | f/8 | f/11 | f/16 | f/22 | f/32 |
| 1.50× (3:2) | f/10 | f/14 | f/20 | f/29 | f/40 |
| 2.00× (2:1) | f/11 | f/16 | f/25 | f/32 | f/45 |
How to use this table:
Pick your marked f-stop (top) and your magnification (left). The cell shows your effective f-stop — how it actually behaves for brightness, depth of field, and diffraction.
Table B — Light Loss (in Stops) vs. Magnification
Light loss in stops ≈ 2 × log₂(1 + M) (rounded here for speed)
| Magnification (M) | ~Stops of Light Lost |
|---|---|
| 0.25× | 0.6 stop |
| 0.50× | 1.2 stops |
| 0.75× | 1.6 stops |
| 1.00× | 2.0 stops |
| 1.50× | 2.6 stops |
| 2.00× | 3.2 stops |
Quick mental cheat:
0.5× ≈ +1 stop, 1× ≈ +2 stops, 2× ≈ +3 stops, 3× ≈ +4 stops.
More distance between lens and sensor → effective aperture gets smaller → less light.
Estimating Magnification with Extension (Fast Field Method)
Prime lens near infinity:
M ≈ extension (mm) ÷ focal length (mm)- 50 mm + 25 mm tube → ~0.5×
- 100 mm + 50 mm tube → ~0.5×
- 50 mm + 50 mm tube → ~1.0×
If your lens already focuses close:
Treat that as your starting M, then add (extension ÷ focal length) for a quick estimate. (Real results vary with internal focusing, but this is close enough to plan exposure.)
Practical Takeaway: Predict Light Loss Before You Shoot
Estimate magnification.
With tubes on a prime: M ≈ extension ÷ focal length.Get the effective f-stop.
Multiply your set f-stop by (1 + M).
Example: f/8 at 1:1 → f/16 effective.Plan exposure.
Use Table B (or the quick cheat):- 0.5× → add ~1 stop
- 1× → add ~2 stops
- 2× → add ~3+ stops
Decide: slower shutter, higher ISO, or more light (flash/LED/daylight).
Tip: Your camera’s meter usually compensates automatically (TTL), but you’ll feel it as slower shutter speeds, higher ISO, or a darker live view/OVF. Plan lighting and support (tripod/flash) accordingly.
Notes & Caveats (Worth Knowing)
- Internal focusing and zoom designs can change the “real” focal length at close range, so the M ≈ extension/focal rule is an estimate. The tables still get you close enough for planning.
- Brand displays differ: some cameras show the effective f-stop at high magnification; others always show the set f-stop. Either way, physics wins — expect the light loss.
- Close-up filters (diopters) boost magnification without increasing the effective f-stop (exposure stays brighter), though image quality depends on the filter.
What’s Next: Diffraction
So now you understand how effective aperture works in budget macro photography. You might be thinking: “No problem — I’ll just put my camera on a tripod and close the aperture as much as I need, and that will fix the light loss.”
Unfortunately, it’s not that simple. At very high apertures (f/22, f/32, and beyond), another effect comes into play — diffraction.
In simple terms, diffraction happens because light doesn’t travel in perfectly straight lines. As it squeezes through a very small opening, the light waves spread out and interfere with each other. The result is that fine details in your photo start to look softer, even if your focus is spot-on.
And that’s exactly what the next post will be about: how diffraction affects macro photography, and how to balance sharpness with depth of field.